> ## Documentation Index
> Fetch the complete documentation index at: https://help.odia.app/llms.txt
> Use this file to discover all available pages before exploring further.
# Invoices
> Create, manage, and track invoices from confirmed Journeys.
## Overview
Odia's invoice management system allows you to create professional invoices from confirmed Journeys and track payment status.
Generate invoices automatically from confirmed Journeys with all service details pre-populated
Track invoice status from draft to paid, monitor outstanding balances, and manage payment timelines
## Invoice Management
**Invoices are created from confirmed Journeys:**
Ensure the Journey is confirmed with all services finalized and pricing set
**From the Journey:**
1. Navigate to the confirmed Journey
2. Click the invoice/billing button
3. Create invoice - all line items (services) are automatically populated
**Or from the Invoices screen:**
1. Click "Create Invoice"
2. Select the Journey
3. Review auto-populated details
Verify all information is correct:
* Customer/traveller information
* Service line items and amounts
* Payment terms and due date
* Any additional notes or terms
* Send to client via email (PDF attachment)
* Download as PDF for manual distribution
**The invoices screen displays:**
* **Invoice numbers** - Auto-generated unique identifiers
* **Recipient names** - Traveller, travel agent, or supplier billed
* **Issue and due dates** - When invoice was created and when payment is due
* **Total amounts** - Full invoice amount
* **Payment status** - Draft, Sent, Partially Paid, Paid, Overdue, or Cancelled
* **Summary statistics** - Total invoices, total amounts, outstanding balances
**Actions available:**
* Click any invoice row to view full details
* Use search and filters to find specific invoices
* Bulk select for batch operations
**Modify invoice details before or after sending:**
* **Update customer information** - Name, contact, billing address
* **Adjust line items** - Add, remove, or modify services
* **Change payment terms** - Net 15, Net 30, custom terms
* **Modify due dates** - Extend or shorten payment timeline
* **Add notes or terms** - Payment instructions, terms & conditions
**Important:**
* You can edit invoices in "Draft" status freely
* For "Sent" invoices, edits create a new version
If you change a service's price or description on the Journey after creating an invoice, the invoice will flag those changes with an **"Updated"** badge. See [Change Detection](#change-detection) for details.
## Supplier Commission Invoices
Supplier commission invoices bill a supplier for commission they owe your organisation. This is the opposite of a supplier bill or purchase invoice, where your organisation owes the supplier.
In the Journey's **Financials** tab, select the **Supplier commission** card and open the service row's **Actions** menu.
Select **Create Invoice**. You can add other eligible commission rows only when they use the same supplier, currency, and settlement type.
Confirm the supplier organisation, commission amounts, issue date, due date, and payment terms.
Once an invoice covers a commission row, use **View Invoice** or **Mark Invoice as Paid** from Financials. The invoice becomes the payment-status source of truth.
| Commission arrangement | Invoice behaviour |
| ------------------------------ | ------------------------------------------------------------------------------------------------------- |
| **Collected** or Client-direct | Collectible invoice. Paying it in full updates covered commission rows to **Received** or **Paid**. |
| **Netted** | Documentation-only invoice. The commission remains **In margin** and the invoice cannot be marked paid. |
A partially paid supplier commission invoice remains **To collect · invoiced** until the complete invoice is paid. Partial payments are not allocated to individual commission rows.
Due dates and overdue status belong to the invoice, not to an uninvoiced commission row. For setup, split calculations, statuses, and corrections, see [Supplier Commissions](/features/supplier-commissions).
## Cost Control
Use **Cost Control** in a confirmed Journey's **Financials** tab to reconcile supplier invoices with Journey services.
Open the Cost metric, select **Cost Control**, and upload the supplier's PDF.
Check the supplier, currency, total, and extracted lines. If the invoice could not be read, upload a cleaner copy or retry.
Select **Add invoice**, then review Odia's service suggestions. You can match an extracted line to a current or archived service from the same Journey.
Delete an individual extracted line, detach an invoice that is also linked to another Journey, or delete the supplier invoice and its PDF.
Odia keeps the uploaded invoice, extracted lines, matching suggestions, and affected cost values visible while each change is processed. If a suggestion cannot be loaded, the invoice remains available for review.
## Invoice Details
Every invoice contains:
**Essential invoice data:**
* **Invoice number** - Auto-generated unique ID
* **Issue date** - Date invoice was created
* **Due date** - Payment deadline
* **Reference to Journey** - Link to source trip
Invoice numbers follow your organization's format.
**Client/billing information:**
* **Customer name** - Who is being billed (traveller or agency)
* **Contact information** - Email, phone
* **Billing address** - Full address for payment
* **Email for delivery** - Where to send the invoice
* **Show/hide organization** - Toggle organization name visibility
Pulled automatically from traveller or agent profile.
**Service breakdown from Journey:**
* **Service descriptions** - Name and details of each service
* **Individual amounts** - Price per service
* **Quantities** - Number of participants (pax) if applicable
* **Subtotals and totals** - Calculated automatically
Each selected service normally becomes a line item. A client-facing bundle can instead appear as one package line.
### Bundles on Invoices
When a customer invoice includes a bundle configured as one client service, Odia saves one package line using the bundle title and combined eligible amount. The member services continue to hold their own pricing, costs, suppliers, and commission details.
* Customer invoice, public link, PDF, and QuickBooks use the saved package line
* Supplier invoices remain itemized by service
* Client-direct member services do not add a customer amount
* Older or itemized bundles continue to show their member service lines
Issued invoices keep the bundle wording and amount saved on that invoice. Later Journey edits do not silently rebuild the issued line.
### Line Item Descriptions
Add descriptions to individual line items on your invoices. Descriptions appear below each service name on the PDF and public invoice link, giving your clients more context about what they're paying for.
**Set a default description source so every new invoice starts with descriptions pre-filled.**
Go to **Settings → Invoices** and find the **Line Item Description Default** option
Select which field to copy into line item descriptions when a new invoice is created:
* **None** — No automatic descriptions (default)
* **Headline** — Copies the service headline
* **Additional Information** — Copies the "Additional information" field from each service
When you create a new invoice, descriptions are automatically populated from your chosen source. You can then edit them freely on the invoice.
Once descriptions are on the invoice, they belong to the invoice. Editing them won't change anything on the Journey, and editing the Journey won't overwrite your invoice descriptions.
**You can also add or edit descriptions on individual line items at any time:**
1. Open the invoice in edit mode
2. Hover over a service line item and click the description dropdown
3. Choose **Custom description**, **Use headline**, or **Use additional info**
4. Edit the text as needed (max 500 characters)
5. Click the **X** button next to the description to remove it
Descriptions are saved when you save the invoice.
### Change Detection
When you edit an existing invoice, the system checks whether any services have been updated on the Journey since the invoice was last saved. If something changed, you'll see an **"Updated"** badge on the affected line items.
**The system tracks two types of changes:**
| Change | What It Means |
| ------------------------------ | ------------------------------------------------------------------------------------------------------------------ |
| **Price updated** | The service price on the Journey was changed after the invoice was saved |
| **Description source updated** | The headline or additional information field that the description was copied from has been modified on the Journey |
**How it works:**
* When you save an invoice, the system takes a snapshot of each service's price and description source
* Next time you open the invoice for editing, it compares the snapshots against the current Journey data
* Any differences show an **"Updated"** badge next to the service name
* Hover over the badge to see exactly what changed (e.g., "Price changed: $500 → $600")
**The badge is informational — nothing changes automatically.** You decide what to do:
* **Accept the changes** — Simply save the invoice. The new prices and descriptions become the new snapshots.
* **Keep the original values** — If you prefer the original price on the invoice, no action needed. The public invoice and PDF will continue showing the price that was locked when you last saved.
* **Review first** — Hover over each "Updated" badge to understand what changed before deciding.
Invoices are financial documents. Prices shown on the public invoice link and PDF are always the prices from when you last saved — they don't change silently. The "Updated" badge helps you stay aware of changes so you can decide when to update.
**Invoice prices are locked at save time:**
* When you create or save an invoice, each service's price is captured as a snapshot
* The **public invoice link** and **PDF export** always use these saved prices — not the live Journey prices
* If someone changes a service price on the Journey, your invoice stays unchanged until you explicitly save it again
* This ensures your client always sees the price you approved
**For existing invoices created before this feature:** The first time you save them, prices will be captured. Until then, they use the current Journey prices.
### Invoice Currency
Choose the display currency for your invoice totals using the currency selector in the invoice header.
**How currency selection works:**
**Automatic detection:**
* The system automatically detects and defaults to the common currency when all services share the same selling currency
* If services have mixed currencies, no default is set
**Manual override:**
* Use the currency dropdown in the invoice header to change the display currency
* Select from currencies configured in your organization settings
**Where currency applies:**
* Invoice total displayed in the editor
* PDF export
* Public invoice view (if shared with clients)
The currency selector affects how totals are displayed. Individual line items retain their original currencies for reference.
### Organization Display
Control whether the organization name appears on invoices when a billing contact is linked to an organization.
**Toggle organization visibility on invoices:**
When a billing contact is linked to an organization (e.g., a travel agency), you can choose whether the organization name appears on the invoice.
**How to use:**
1. Open the invoice in edit mode
2. Find the **"Show organization name"** toggle in the billing section
3. Toggle on to display the organization name
4. Toggle off to show only the contact name
**Where it appears:**
* Invoice editor preview
* PDF export
* Public invoice view
**Use cases:**
* **Show organization:** When billing a travel agency or corporate client where the company name should appear
* **Hide organization:** When billing an individual traveller who happens to be linked to an organization but should receive a personal invoice
### Invoice Status
**Track invoice lifecycle with these statuses:**
| Status | Description | When to Use |
| -------------- | ---------------------------------- | ------------------------------------------------------------- |
| Draft | Invoice created but not sent | Initial creation, still being reviewed/edited |
| Sent | Invoice delivered to client | After sending via email or sharing |
| Partially Paid | Some payment received | When client has made a partial payment |
| Paid | Payment received in full | When client has paid the full amount |
| Overdue | Past due date without full payment | Automatically set when due date passes |
| Cancelled | Invoice is no longer valid | Client cancelled, services won't happen, or invoice was wrong |
**Status changes:**
* Use the invoice actions to update lifecycle statuses such as Sent or Cancelled
* "Overdue" status is automatically applied after due date
* "Partially Paid" and "Paid" update automatically when you record payments
**Filter invoices by status on the invoices list page:**
* Click the **Status** filter button in the toolbar
* Select one or more statuses to filter by (multi-select)
* A badge shows how many status filters are active
* Click **Clear Filters** to reset and show all invoices
**Quick tip:** Filter by "Sent" + "Overdue" to see all outstanding invoices that need follow-up.
**Update invoice status based on:**
**Manual updates:**
* Mark as "Sent" after emailing to client
* Use **Mark as Paid** to create a payment for a positive outstanding balance
* Mark as "Cancelled" when the invoice is no longer valid
* Change due date if payment terms are renegotiated
**Automatic updates:**
* Status changes to "Overdue" automatically when due date passes
**Best practice:** Update status promptly when you receive payment to maintain accurate records.
### Cancelled vs Archived
Understanding the difference between cancelling and archiving an invoice is important — they serve different purposes and have different effects on your financial data.
**Cancel = "This invoice is no longer valid"**
Cancelling is a **business action** that keeps the invoice in your records as a cancelled record.
**Use when:**
* The client cancelled the trip or services
* Services will no longer be delivered
* The invoice was sent with wrong details and you want to keep a record of it
* You created a new corrected invoice and need to void the old one
**What happens:**
* Invoice status changes to **"Cancelled"**
* The invoice stays visible in your list (filterable by "Cancelled" status)
* Cancelled invoices are **still part of your business data** — they appear in analytics as cancelled records
* Payments on cancelled invoices are excluded from financial calculations
* Cancellation is **permanent** — you cannot undo it (create a new invoice instead)
Cancelled invoices are valuable for year-end reporting. They help you track how many invoices were cancelled and identify patterns. In the future, refund tracking will be linked to cancelled invoices.
**Archive = "Hide this from my view"**
Archiving is a **housekeeping action** — a soft delete that removes the invoice from your default list.
**Use when:**
* You created a test invoice while learning the system
* A duplicate invoice was created by mistake
* You want to clean up old paid invoices from your active list
* The invoice was started but you want to start fresh with a new one
**What happens:**
* Invoice is hidden from your default invoice list
* Archived invoices are **excluded from all financial calculations** (collected amounts, analytics)
* You can **restore** an archived invoice at any time
* Use the archive toggle on the invoices list to view archived invoices
Archiving an invoice removes its payments from your financial analytics. Only archive invoices that should not count toward your business numbers (test data, duplicates, errors).
| | **Cancelled** | **Archived** |
| --------------------------- | --------------------------------------- | ----------------------------------- |
| **What it means** | Invoice is no longer valid | Hide from my view |
| **Use when** | Client cancelled, services won't happen | Test data, duplicates, mistakes |
| **In financial analytics?** | Yes — counts as a cancelled invoice | No — excluded from all calculations |
| **Reversible?** | No (create a new invoice instead) | Yes (restore anytime) |
| **Visible in list?** | Yes (filter by "Cancelled") | No (unless archive toggle is on) |
| **Future** | Refund tracking will link here | No financial significance |
**Rule of thumb:**
* If it's a real business event (client cancelled) → **Cancel** it
* If it's cleanup (test data, mistake, duplicate) → **Archive** it
## Extra Services Management
Add additional services or charges to invoices outside of the main Journey:
### Adding Extra Services
Navigate to the invoice you want to edit
Click **Add Extra Service** button
Fill in:
* **Service Name** (e.g., "Travel Insurance", "Visa Processing")
* **Description**
* **Quantity**
* **Unit Price**
* **Currency**
Click **Add** - service appears on invoice immediately
### Managing Extra Services
**Edit Extra Service:**
1. Click the edit icon next to the service
2. Update any field
3. Click **Save Changes**
**Delete Extra Service:**
1. Click the delete icon
2. Confirm deletion
3. Service is removed from invoice
Extra services are separate from Journey services and can be added or removed without affecting the main trip.
### Use Cases
**Common extra services:**
* Travel insurance policies
* Visa processing fees
* Airport transfers not in Journey
* Special requests or add-ons
* Admin fees or booking charges
* Currency conversion fees
Use extra services for one-time charges that don't need to be tracked as full services in the Journey.
## Filtering & Search
Find invoices quickly using search and filters:
**Find invoices by searching for:**
* **Invoice number** - Exact invoice ID
* **Customer name** - Traveller or agency name
* **Associated Journey** - Original Journey reference
* **Date ranges** - Issue date or due date
Search looks across all these fields simultaneously.
**Narrow down results by:**
* **Status** - Draft, Sent, Partially Paid, Paid, Overdue, Cancelled (multi-select)
* **Date range** - Issue date or due date ranges
* **Amount range** - Minimum/maximum invoice amounts
* **Archive toggle** - Show or hide archived invoices
Combine multiple filters for precise results.
**Quick workflow:** Use the search bar combined with filters to quickly locate specific invoices. For example, search for a customer name and filter by "Overdue" status to identify outstanding payments that need follow-up.
## Payment Management
Odia's payment tracking system allows you to record payments against invoices, track partial payments, and automatically update invoice status based on payment totals.
### Payment Instructions
Payment instruction profiles let you save reusable payment wording for different bank accounts, currencies, or payment methods, then choose the instructions that belong on each invoice.
#### Create and manage payment instruction profiles
Go to **Settings → Organization → General Settings**. Open **Invoicing**, then select **Payment Instructions**.
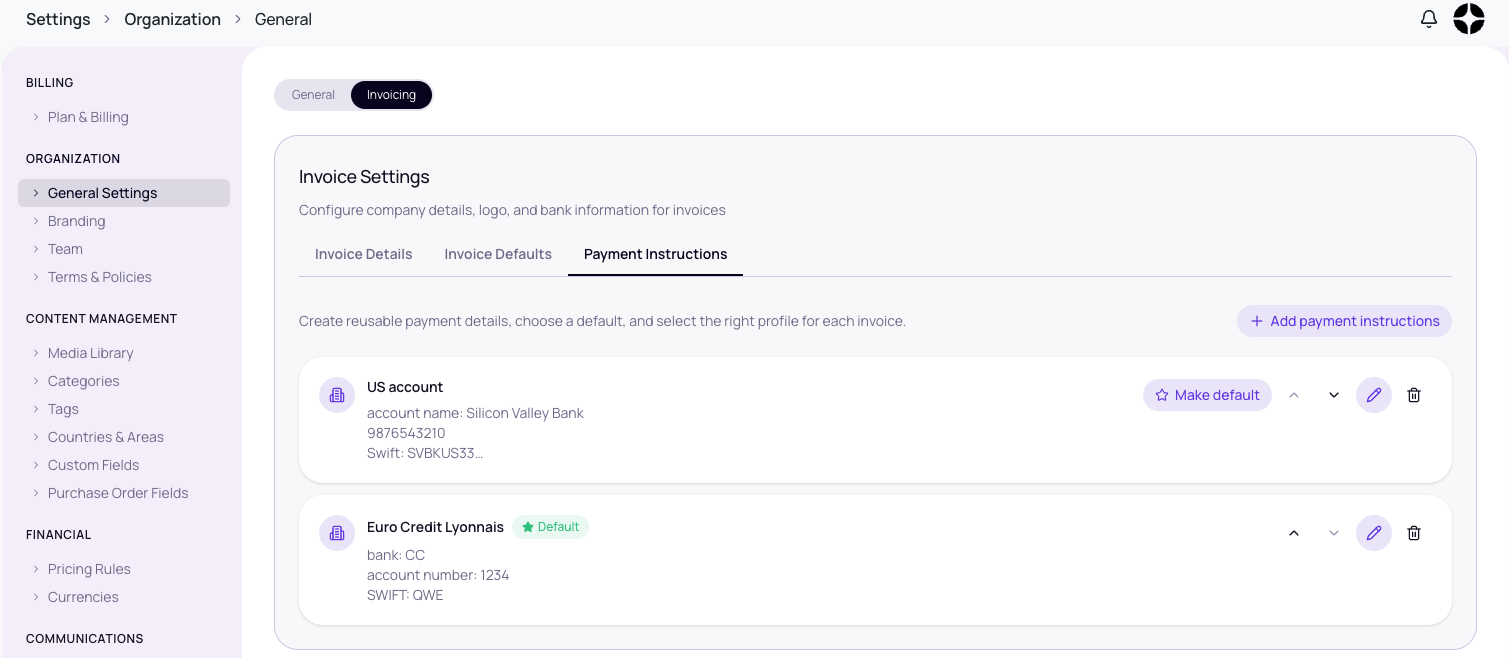 Select **Add payment instructions**. Enter:
* **Name** — the heading your client will see, such as “Domestic transfer” or “International wire”
* **Details shown on the invoice** — the account details, reference instructions, or other payment wording your client needs
Use one line per detail so the instructions are easy to scan, then select **Add payment instructions**.
Select **Add payment instructions**. Enter:
* **Name** — the heading your client will see, such as “Domestic transfer” or “International wire”
* **Details shown on the invoice** — the account details, reference instructions, or other payment wording your client needs
Use one line per detail so the instructions are easy to scan, then select **Add payment instructions**.
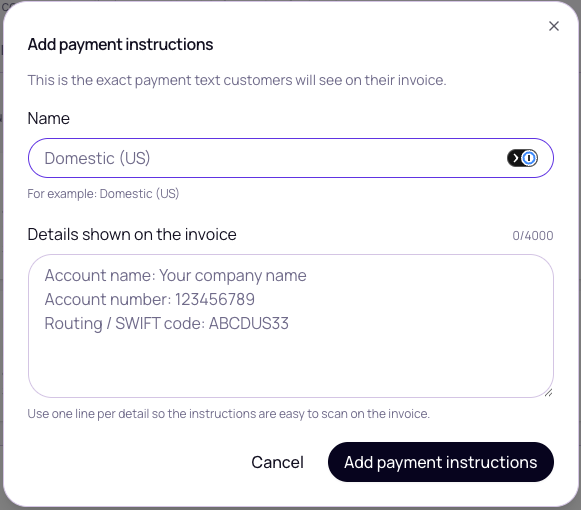 Select **Make default** on the profile that should be selected automatically on new invoices. Use the up and down arrows to control the order in which selected profiles appear.
Select **Save Changes**. You can keep up to ten profiles and return here to add, edit, reorder, or delete them.
#### Choose payment instructions for an invoice
Create a new invoice or open an invoice that is still in **Draft**.
Find **Payment instructions** on the invoice. The default profile is selected automatically on a new invoice.
Select a profile to include it or select it again to remove it. You can include several profiles or leave all profiles unselected when no payment instructions are needed.
Select **Make default** on the profile that should be selected automatically on new invoices. Use the up and down arrows to control the order in which selected profiles appear.
Select **Save Changes**. You can keep up to ten profiles and return here to add, edit, reorder, or delete them.
#### Choose payment instructions for an invoice
Create a new invoice or open an invoice that is still in **Draft**.
Find **Payment instructions** on the invoice. The default profile is selected automatically on a new invoice.
Select a profile to include it or select it again to remove it. You can include several profiles or leave all profiles unselected when no payment instructions are needed.
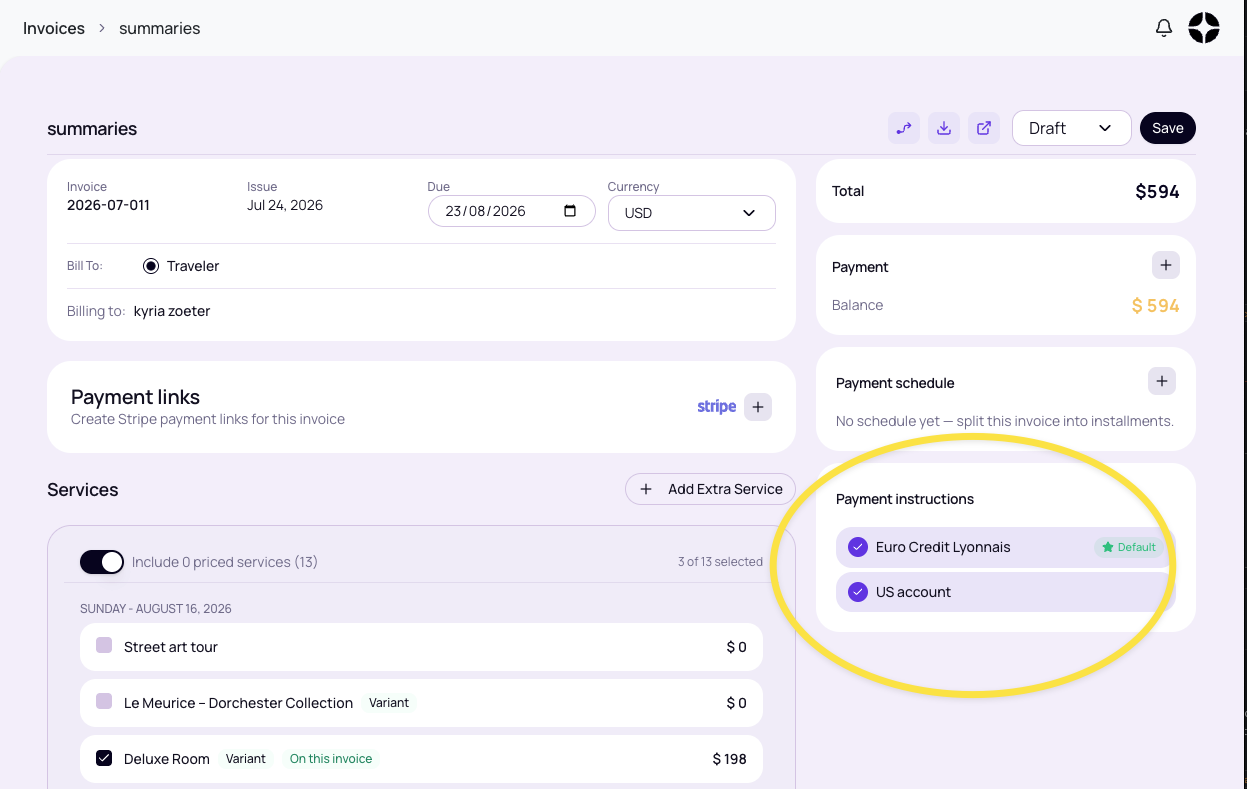 Save the draft, then issue it when it is ready. The selected instructions appear on the public invoice and PDF.
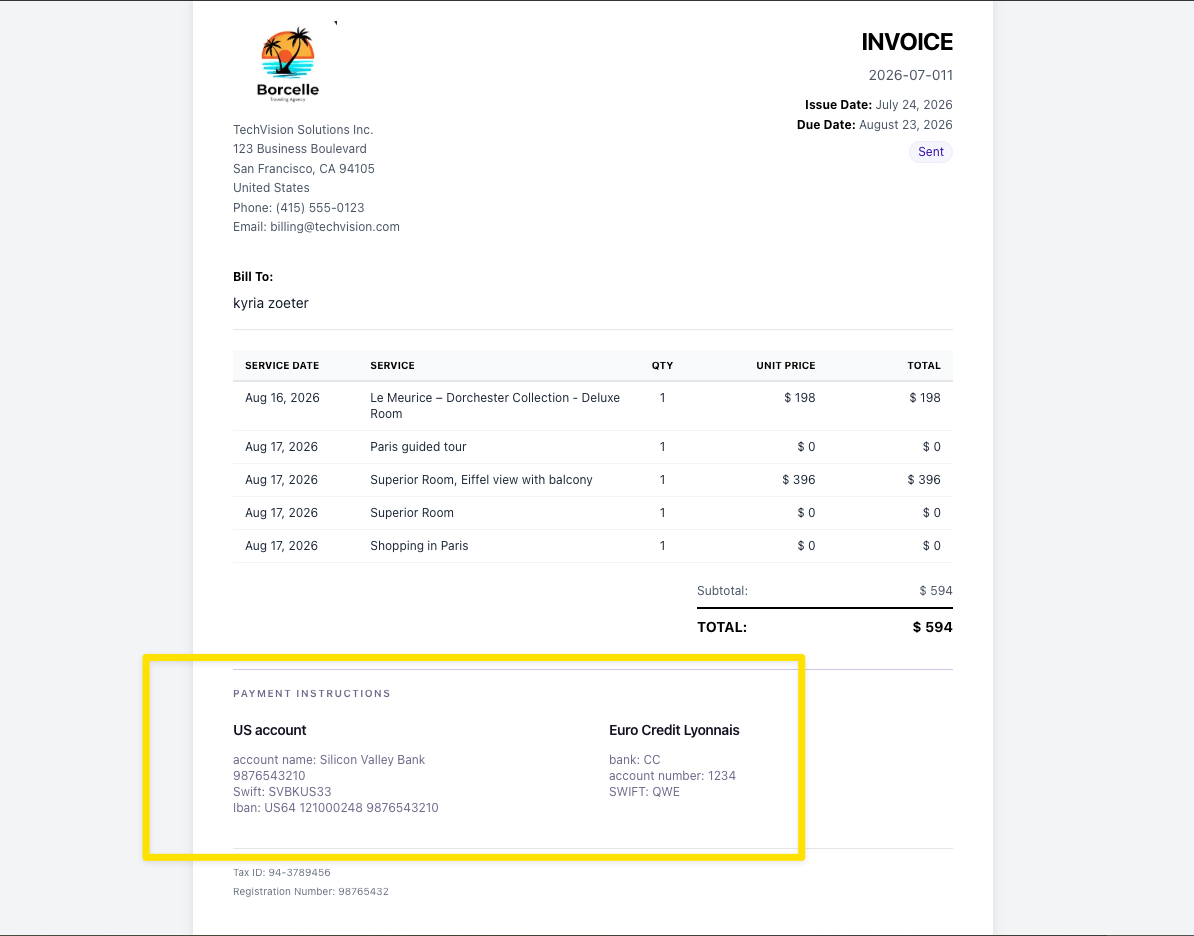 When an invoice is issued, Odia freezes its selected names and wording. Later edits or deletions in Settings do not change that issued invoice. Changes to a profile can still affect drafts using it, and deleting a selected profile requires you to choose the instructions again before saving the draft.
Payment instruction profiles are formatted text, not connected bank accounts. Only Owners and Admins can manage the profiles in Settings. Existing invoices that use legacy bank details continue to display those details.
Record individual payments against invoices with full details - amount, date, and notes. Perfect for tracking partial payments or multiple payment installments.
Quick action for a positive outstanding balance. It creates a payment record for the remaining amount and updates the status automatically.
An invoice must have a positive total before you can record a payment or use **Mark as Paid**. A zero-total invoice remains unpaid until its total is corrected.
### Recording Individual Payments
**Where to access:** Open any invoice in edit mode and find the payment tracker in the right sidebar.
Navigate to the invoice you want to record a payment for and open it in edit mode
In the right sidebar, click the **"+ Record Payment"** button
A dialog will open showing:
* **Payment Context** - Invoice total, amount already paid, and remaining balance
* **Payment Amount** - Enter the amount received (can be partial or full payment)
* **Payment Date** - Select when the payment was received (defaults to today)
* **Notes (Optional)** - Add transaction ID, payment method, or other reference notes
Click **"Record Payment"** to save. The invoice status will update automatically based on the total amount paid
**Partial payments are fully supported!** You can record multiple payments over time until the invoice is paid in full. Each payment is tracked separately with its own date and notes.
**Add detailed notes** to each payment for better tracking. Include information like:
* Payment method (wire transfer, check, credit card)
* Transaction or reference number
* Bank confirmation code
* Any special conditions or agreements
**Where to access:** Invoice list page action menu (three-dot menu on each invoice row)
On the invoices list page, click the **"..."** button on any invoice row
Choose **"Mark as Paid"** from the dropdown menu. It is available when the invoice has a positive outstanding balance.
The system automatically:
* Creates a payment record for the exact remaining balance
* Sets the payment date to today
* Adds a note "Marked as paid"
* Updates the invoice status to "Paid"
**When to use this:**
* You received full payment and don't need detailed tracking
* Quick status updates for cash or simple transactions
* Batch processing multiple paid invoices
**When to use "Record Payment" instead:**
* Partial payments received
* Need to specify payment date other than today
* Want to add detailed payment notes or reference numbers
* Multiple payment methods or installments
**Where payments are shown:**
**1. Invoice Edit Page Sidebar**
* **Unified Payment Tracker** - Compact view with:
* Invoice total amount
* Total paid with progress bar
* Remaining balance highlighted
* Collapsible payment history list
* Quick access to record new payments
**2. Payment History Table**
* Located below the services section on invoice edit page
* Shows all payments with:
* Payment date (formatted)
* Amount (currency formatted)
* Notes or reference information
* Delete button for each payment
**3. Invoice List Page**
* Payment status badge on each invoice
* Color-coded status indicators
* At-a-glance payment tracking
The payment tracker shows a **visual progress bar** that fills as payments are recorded, making it easy to see at a glance how much of the invoice has been paid.
Invoice payment status is automatically calculated and displayed with color-coded badges:
| Status | Color | When Applied | Description |
| ------------------ | -------------- | ------------------------------------------------ | -------------------------------------------------- |
| **Not Paid** | Gray/Default | Total paid = 0, or invoice total is not positive | No qualifying payment has completed the invoice |
| **Partially Paid** | Orange/Warning | Total paid > 0 but \< invoice total | At least one payment recorded but not paid in full |
| **Fully Paid** | Green/Success | Invoice total > 0 and total paid ≥ invoice total | All payments received |
| **Overpaid** | Blue/Info | Total paid > invoice total | Payments exceed invoice amount |
**Automatic status updates:**
* Status updates happen instantly when you record or delete a payment
* Changing the invoice total recalculates the status against the recorded payments
* No manual status changes needed
* System calculates total paid vs. invoice total automatically
* Works seamlessly with partial payments
The system allows overpayments in case you need to record additional fees, tips, or corrections. The overpaid status will be clearly indicated.
**Deleting a Payment:**
If you need to remove a payment record (e.g., payment was reversed, or recorded in error):
1. Open the invoice in edit mode
2. Find the payment in the payment history list or table
3. Hover over the payment row to reveal the delete icon (trash can)
4. Click delete and confirm
**What happens when you delete a payment:**
* The payment record is permanently removed
* Total paid is recalculated automatically
* Invoice status may change:
* If was "Paid" → reverts to "Sent" or "Partial"
* If was "Partial" → may revert to "Sent" if no other payments
* Remaining balance updates immediately
Deleting a payment is permanent and will affect the invoice status. Make sure this is the correct action before confirming.
**Viewing Payment Summary:**
* Total amount paid is always visible in the payment tracker
* Payment count badge shows number of payments recorded
* Remaining balance is highlighted for easy visibility
* All individual payment details are preserved with dates and notes
**Set payment terms when creating invoices:**
* **Due on receipt** - Payment expected immediately
* **Net 15** - Due in 15 days from issue date
* **Net 30** - Due in 30 days (most common)
* **Net 60** - Due in 60 days
* **Custom terms** - Specify your own timeline
* **Late payment policies** - Add notes about late fees
Payment terms are clearly displayed on the invoice and help set expectations with clients.
Even with payment terms set, you can record payments before or after the due date. Payment dates are independent of due dates, giving you flexibility to track when payments are actually received.
**For optimal payment management:**
1. **Record payments immediately** when received
* Don't wait - update as soon as payment clears
* Keeps your records accurate and current
* Makes it easier to track outstanding invoices
2. **Use detailed payment notes**
* Add transaction IDs, check numbers, or wire references
* Note payment method for your records
* Include any special conditions or arrangements
3. **Leverage partial payment tracking**
* Record deposits or installments as they come in
* Track multiple payments for large invoices
* Monitor progress toward full payment
4. **Choose the right method**
* Use "Record Payment" for partial payments or when details matter
* Use "Mark as Paid" for quick full-payment updates
* Consistency makes tracking easier
5. **Review payment status regularly**
* Filter by "Partially Paid" to identify invoices needing follow-up
* Check "Overdue" status for invoices past due date
* Use payment history for reconciliation and accounting
6. **Date payments accurately**
* Use the actual payment received date, not when you're entering it
* Accurate dates help with cash flow reporting
* Important for tax and accounting purposes
**Pro tip:** If you receive payment via multiple methods (e.g., partial by credit card, remainder by wire), record each as a separate payment with notes indicating the payment method. This creates a complete audit trail.
## Best Practices
**Recommended process for smooth invoicing:**
1. **Create invoices promptly** after Journey confirmation
* Don't delay - create while details are fresh
* Faster invoicing = faster payment
2. **Review carefully** before sending to clients
* Check all amounts and line items
* Verify customer contact information
* Ensure payment terms are correct
3. **Set clear payment terms** and due dates
* Be specific about when payment is due
* Include payment methods accepted
* Add late payment terms if applicable
4. **Send reminders** for upcoming due dates
* Friendly reminder 3-5 days before due date
* Follow up 1-2 days after if overdue
5. **Track overdue invoices** regularly
* Review overdue list weekly
* Have consistent follow-up process
6. **Keep accurate records**
* Update invoice status promptly when payments are received
* Export invoices regularly for accounting purposes
**Keep invoices organized and professional:**
* **Use consistent numbering** - Auto-generated numbering recommended to avoid duplicates
* **Include clear service descriptions** - Make it obvious what traveller is paying for
* **Add reference to Journey/Journey** - Link back to trip details
* **Include payment instructions** - Bank details, payment methods, etc.
* **Attach terms and conditions** - Cancellation policy, payment terms, etc.
**Tip:** Create an invoice template with standard terms and payment instructions.
## Invoice Actions
Common actions you can perform on invoices:
**Generate new invoices** from confirmed Journeys with all service details pre-populated automatically
**Modify invoice details** including line items, amounts, customer info, and payment terms before or after sending
**Delete draft invoices** that are no longer needed. Cannot delete sent or paid invoices.
**Deliver invoices to clients** via email with PDF attachment. Status automatically updates to "Sent"
**Export invoices as PDF** for printing, manual distribution, or record-keeping
**Mark invoices as paid** when payment is received to keep accurate records and track outstanding balances
## Reporting
Invoice reporting helps you track revenue, outstanding balances, and payment trends over time for better cash flow management.
**View at-a-glance metrics at the top of the invoices screen:**
* **Total invoices** - Number of invoices created
* **Total invoiced amount** - Sum of all invoice amounts
* **Outstanding balance** - Amount not yet paid (Sent + Overdue)
* **Paid to date** - Total amount received
Updates automatically as invoices are created and paid.
**Generate custom reports by filtering:**
* **Date range** - Invoices issued or due within specific dates
* **Customer** - All invoices for a specific traveller or agency
* **Status** - Draft, Sent, Partially Paid, Paid, Overdue, or Cancelled
* **Amount ranges** - Invoices above/below certain amounts
Export filtered views for reporting or analysis.
**Cash flow management:** Regularly review your invoice list filtered by "Overdue" status to follow up on outstanding payments. This helps maintain healthy cash flow and reduces bad debt.
## Permissions
**Invoice permissions by user role:**
| Action | Owner | Admin | Supervisor | User |
| ------------------------ | ----- | ----- | ---------- | ---------- |
| View Invoices | ✓ All | ✓ All | ✓ All | ✓ Own only |
| Create Invoices | ✓ | ✓ | ✓ | ✓ Limited |
| Edit Invoices | ✓ All | ✓ All | ✓ All | ✓ Own only |
| Delete Invoices | ✓ | ✓ | ✓ | ✗ |
| View All Invoices | ✓ | ✓ | ✓ | ✗ |
| View Financial Summaries | ✓ | ✓ | ✓ | Limited |
**Notes:**
* **Users** can only see invoices they created
* **Users** have limited invoice creation (from their own confirmed Journeys only)
* **View All** means seeing organization-wide invoices, not just own
## Common Questions
**No.** Invoices in Odia are created from confirmed Journeys. The Journey serves as the source of:
* Service line items
* Pricing information
* Customer/traveller details
* Trip reference
**Workflow:** Journey → Confirmed Journey → Invoice
**Why?** This ensures invoices always match actual confirmed services and prevents billing errors.
**The invoice does NOT automatically update.** Invoices are independent financial documents — prices and descriptions are locked when you save.
**If you change Journey services or pricing:**
1. The public invoice link and PDF continue showing the **original saved prices**
2. When you open the invoice for editing, affected line items show an **"Updated"** badge
3. Hover over the badge to see what changed (e.g., "Price changed: $500 → $600")
4. Save the invoice to accept the new prices, or leave it as-is to keep the original values
**If you add or remove services on the Journey:**
* New services appear with a **"Will be added"** badge — check the box to include them
* Removed services show a **"Will be removed"** badge and are automatically deselected
**Best practice:** Finalize all Journey details before creating invoices. If changes happen afterward, open the invoice to review the "Updated" badges before sending to clients.
**Odia now fully supports partial payment tracking!**
**To record a partial payment:**
1. Open the invoice in edit mode
2. Click **"+ Record Payment"** in the right sidebar
3. Enter the partial amount received (not the full invoice total)
4. Add payment date and optional notes
5. Click "Record Payment"
**What happens automatically:**
* The invoice status updates to **"Partially Paid"** (orange badge)
* The remaining balance is calculated and displayed
* Payment appears in the payment history with all details
* You can record additional payments as they come in
**Tracking multiple partial payments:**
* Each payment is recorded separately with its own date and notes
* Total paid and remaining balance update automatically
* When total payments reach the invoice amount, status changes to "Paid"
* Visual progress bar shows payment completion percentage
**Example:** For a $5,000 invoice, you can record a $2,000 deposit, then later add a \$3,000 final payment. Each payment is tracked individually with full details and notes.
**The "Mark as Paid" quick action automatically:**
1. **Calculates remaining balance** - System checks invoice total vs. payments already recorded
2. **Creates payment record** - Adds a payment for the exact remaining amount
3. **Sets payment date to today** - Uses current date (you can edit later if needed)
4. **Adds automatic note** - Payment note says "Marked as paid"
5. **Updates status to Paid** - Invoice status becomes "Paid" with green badge
**Where to access:**
* Invoice list page → Click "..." menu → Select "Mark as Paid"
* Only available when the invoice has a positive outstanding balance
**When to use:**
* Quick status update when full payment received
* Simple cash transactions without detailed tracking needs
* Batch processing multiple paid invoices
**When NOT to use:**
* The invoice total is zero or needs correction
* Need to record specific payment date other than today
* Want detailed payment notes or reference numbers
* Handling partial payments (use "Record Payment" instead)
**Deleting payments:**
* Yes, you can delete any payment record
* Hover over the payment in the payment history to reveal the delete icon
* Deleting is permanent - invoice status will automatically recalculate
**What happens when you delete a payment:**
* Total paid decreases by the deleted amount
* Invoice status may revert:
* "Paid" → "Partially Paid" or "Sent"
* "Partially Paid" → "Sent" (if no payments remain)
* Remaining balance increases
**Editing payments:**
* Currently, you cannot directly edit a payment
* To correct a payment: Delete the incorrect one and record a new payment with correct details
* This maintains a clean audit trail of all payment changes
Be careful when deleting payments - the action is permanent and will affect the invoice status and remaining balance calculations.
**Invoice status updates automatically based on payments recorded:**
| Total Paid | Status Shown | Badge Color |
| ---------------------------------------- | --------------- | ------------ |
| \$0 | Not Paid / Sent | Gray or Blue |
| $1 to $4,999 (on \$5,000 invoice) | Partially Paid | Orange |
| \$5,000+ (equal to or more than invoice) | Paid | Green |
**Key points:**
* Status calculation is instant - updates as soon as you record or delete a payment
* No manual status changes needed
* System compares total paid vs. invoice total automatically
* A zero-total invoice is never treated as paid
* "Overpaid" status appears if payments exceed invoice total
**Status visibility:**
* Badge appears on invoice list page for quick scanning
* Payment tracker in sidebar shows detailed breakdown
* Color coding makes it easy to identify payment status at a glance
**Yes, absolutely!** Payment recording is available at any time:
**After sending:**
* Invoice status can be "Sent", "Overdue", or any other status
* Record payments as you receive them, regardless of invoice status
* Status will automatically update from "Sent" to "Partially Paid" or "Paid"
**Before sending:**
* You can also record payments on draft invoices
* Useful for pre-paid deposits or advance payments
* Invoice will show correct payment status when sent to client
**Payment dates are flexible:**
* Record payments with past dates (backdated payments)
* Use today's date (default)
* Set future dates if needed for accounting purposes
**Common workflow:** Client sends payment → You verify it cleared → Immediately record payment in Odia → Invoice status auto-updates → Client sees updated status if they have access.
**Invoice branding:** Your organization logo and branding from Settings appear on invoices automatically.
**Template customization:** Full custom template design is not currently available. Invoices use a standard professional format with your branding.
**What you can customize:**
* Organization logo
* Contact information
* Payment terms and instructions
* Additional notes and terms
**Future enhancement:** Custom invoice templates are planned for future development.
**For audit and record-keeping reasons:**
* Once an invoice is sent to a client, it becomes part of your financial record
* Deleting sent invoices could create gaps in your invoice numbering
* Accounting best practices require maintaining invoice history
**What to do instead:**
* **Cancel** the invoice if the client cancelled or services won't happen (keeps a business record)
* **Archive** the invoice if it was a mistake or duplicate (removes from all views and calculations)
* Create a new corrected invoice if needed
**Can delete:** Draft invoices that have never been sent
## Related Documentation
* [Confirmed Journeys](/features/itineraries) - Creating confirmed Journeys that generate invoices
* [Journeys](/features/proposals) - Building Journeys that can be confirmed and invoiced
* [Supplier Commissions](/features/supplier-commissions) - Billing suppliers for commission they owe you
* [Settings - Financial](/features/settings#financial) - Setting up currencies and payment terms
When an invoice is issued, Odia freezes its selected names and wording. Later edits or deletions in Settings do not change that issued invoice. Changes to a profile can still affect drafts using it, and deleting a selected profile requires you to choose the instructions again before saving the draft.
Payment instruction profiles are formatted text, not connected bank accounts. Only Owners and Admins can manage the profiles in Settings. Existing invoices that use legacy bank details continue to display those details.
Record individual payments against invoices with full details - amount, date, and notes. Perfect for tracking partial payments or multiple payment installments.
Quick action for a positive outstanding balance. It creates a payment record for the remaining amount and updates the status automatically.
An invoice must have a positive total before you can record a payment or use **Mark as Paid**. A zero-total invoice remains unpaid until its total is corrected.
### Recording Individual Payments
**Where to access:** Open any invoice in edit mode and find the payment tracker in the right sidebar.
Navigate to the invoice you want to record a payment for and open it in edit mode
In the right sidebar, click the **"+ Record Payment"** button
A dialog will open showing:
* **Payment Context** - Invoice total, amount already paid, and remaining balance
* **Payment Amount** - Enter the amount received (can be partial or full payment)
* **Payment Date** - Select when the payment was received (defaults to today)
* **Notes (Optional)** - Add transaction ID, payment method, or other reference notes
Click **"Record Payment"** to save. The invoice status will update automatically based on the total amount paid
**Partial payments are fully supported!** You can record multiple payments over time until the invoice is paid in full. Each payment is tracked separately with its own date and notes.
**Add detailed notes** to each payment for better tracking. Include information like:
* Payment method (wire transfer, check, credit card)
* Transaction or reference number
* Bank confirmation code
* Any special conditions or agreements
**Where to access:** Invoice list page action menu (three-dot menu on each invoice row)
On the invoices list page, click the **"..."** button on any invoice row
Choose **"Mark as Paid"** from the dropdown menu. It is available when the invoice has a positive outstanding balance.
The system automatically:
* Creates a payment record for the exact remaining balance
* Sets the payment date to today
* Adds a note "Marked as paid"
* Updates the invoice status to "Paid"
**When to use this:**
* You received full payment and don't need detailed tracking
* Quick status updates for cash or simple transactions
* Batch processing multiple paid invoices
**When to use "Record Payment" instead:**
* Partial payments received
* Need to specify payment date other than today
* Want to add detailed payment notes or reference numbers
* Multiple payment methods or installments
**Where payments are shown:**
**1. Invoice Edit Page Sidebar**
* **Unified Payment Tracker** - Compact view with:
* Invoice total amount
* Total paid with progress bar
* Remaining balance highlighted
* Collapsible payment history list
* Quick access to record new payments
**2. Payment History Table**
* Located below the services section on invoice edit page
* Shows all payments with:
* Payment date (formatted)
* Amount (currency formatted)
* Notes or reference information
* Delete button for each payment
**3. Invoice List Page**
* Payment status badge on each invoice
* Color-coded status indicators
* At-a-glance payment tracking
The payment tracker shows a **visual progress bar** that fills as payments are recorded, making it easy to see at a glance how much of the invoice has been paid.
Invoice payment status is automatically calculated and displayed with color-coded badges:
| Status | Color | When Applied | Description |
| ------------------ | -------------- | ------------------------------------------------ | -------------------------------------------------- |
| **Not Paid** | Gray/Default | Total paid = 0, or invoice total is not positive | No qualifying payment has completed the invoice |
| **Partially Paid** | Orange/Warning | Total paid > 0 but \< invoice total | At least one payment recorded but not paid in full |
| **Fully Paid** | Green/Success | Invoice total > 0 and total paid ≥ invoice total | All payments received |
| **Overpaid** | Blue/Info | Total paid > invoice total | Payments exceed invoice amount |
**Automatic status updates:**
* Status updates happen instantly when you record or delete a payment
* Changing the invoice total recalculates the status against the recorded payments
* No manual status changes needed
* System calculates total paid vs. invoice total automatically
* Works seamlessly with partial payments
The system allows overpayments in case you need to record additional fees, tips, or corrections. The overpaid status will be clearly indicated.
**Deleting a Payment:**
If you need to remove a payment record (e.g., payment was reversed, or recorded in error):
1. Open the invoice in edit mode
2. Find the payment in the payment history list or table
3. Hover over the payment row to reveal the delete icon (trash can)
4. Click delete and confirm
**What happens when you delete a payment:**
* The payment record is permanently removed
* Total paid is recalculated automatically
* Invoice status may change:
* If was "Paid" → reverts to "Sent" or "Partial"
* If was "Partial" → may revert to "Sent" if no other payments
* Remaining balance updates immediately
Deleting a payment is permanent and will affect the invoice status. Make sure this is the correct action before confirming.
**Viewing Payment Summary:**
* Total amount paid is always visible in the payment tracker
* Payment count badge shows number of payments recorded
* Remaining balance is highlighted for easy visibility
* All individual payment details are preserved with dates and notes
**Set payment terms when creating invoices:**
* **Due on receipt** - Payment expected immediately
* **Net 15** - Due in 15 days from issue date
* **Net 30** - Due in 30 days (most common)
* **Net 60** - Due in 60 days
* **Custom terms** - Specify your own timeline
* **Late payment policies** - Add notes about late fees
Payment terms are clearly displayed on the invoice and help set expectations with clients.
Even with payment terms set, you can record payments before or after the due date. Payment dates are independent of due dates, giving you flexibility to track when payments are actually received.
**For optimal payment management:**
1. **Record payments immediately** when received
* Don't wait - update as soon as payment clears
* Keeps your records accurate and current
* Makes it easier to track outstanding invoices
2. **Use detailed payment notes**
* Add transaction IDs, check numbers, or wire references
* Note payment method for your records
* Include any special conditions or arrangements
3. **Leverage partial payment tracking**
* Record deposits or installments as they come in
* Track multiple payments for large invoices
* Monitor progress toward full payment
4. **Choose the right method**
* Use "Record Payment" for partial payments or when details matter
* Use "Mark as Paid" for quick full-payment updates
* Consistency makes tracking easier
5. **Review payment status regularly**
* Filter by "Partially Paid" to identify invoices needing follow-up
* Check "Overdue" status for invoices past due date
* Use payment history for reconciliation and accounting
6. **Date payments accurately**
* Use the actual payment received date, not when you're entering it
* Accurate dates help with cash flow reporting
* Important for tax and accounting purposes
**Pro tip:** If you receive payment via multiple methods (e.g., partial by credit card, remainder by wire), record each as a separate payment with notes indicating the payment method. This creates a complete audit trail.
## Best Practices
**Recommended process for smooth invoicing:**
1. **Create invoices promptly** after Journey confirmation
* Don't delay - create while details are fresh
* Faster invoicing = faster payment
2. **Review carefully** before sending to clients
* Check all amounts and line items
* Verify customer contact information
* Ensure payment terms are correct
3. **Set clear payment terms** and due dates
* Be specific about when payment is due
* Include payment methods accepted
* Add late payment terms if applicable
4. **Send reminders** for upcoming due dates
* Friendly reminder 3-5 days before due date
* Follow up 1-2 days after if overdue
5. **Track overdue invoices** regularly
* Review overdue list weekly
* Have consistent follow-up process
6. **Keep accurate records**
* Update invoice status promptly when payments are received
* Export invoices regularly for accounting purposes
**Keep invoices organized and professional:**
* **Use consistent numbering** - Auto-generated numbering recommended to avoid duplicates
* **Include clear service descriptions** - Make it obvious what traveller is paying for
* **Add reference to Journey/Journey** - Link back to trip details
* **Include payment instructions** - Bank details, payment methods, etc.
* **Attach terms and conditions** - Cancellation policy, payment terms, etc.
**Tip:** Create an invoice template with standard terms and payment instructions.
## Invoice Actions
Common actions you can perform on invoices:
**Generate new invoices** from confirmed Journeys with all service details pre-populated automatically
**Modify invoice details** including line items, amounts, customer info, and payment terms before or after sending
**Delete draft invoices** that are no longer needed. Cannot delete sent or paid invoices.
**Deliver invoices to clients** via email with PDF attachment. Status automatically updates to "Sent"
**Export invoices as PDF** for printing, manual distribution, or record-keeping
**Mark invoices as paid** when payment is received to keep accurate records and track outstanding balances
## Reporting
Invoice reporting helps you track revenue, outstanding balances, and payment trends over time for better cash flow management.
**View at-a-glance metrics at the top of the invoices screen:**
* **Total invoices** - Number of invoices created
* **Total invoiced amount** - Sum of all invoice amounts
* **Outstanding balance** - Amount not yet paid (Sent + Overdue)
* **Paid to date** - Total amount received
Updates automatically as invoices are created and paid.
**Generate custom reports by filtering:**
* **Date range** - Invoices issued or due within specific dates
* **Customer** - All invoices for a specific traveller or agency
* **Status** - Draft, Sent, Partially Paid, Paid, Overdue, or Cancelled
* **Amount ranges** - Invoices above/below certain amounts
Export filtered views for reporting or analysis.
**Cash flow management:** Regularly review your invoice list filtered by "Overdue" status to follow up on outstanding payments. This helps maintain healthy cash flow and reduces bad debt.
## Permissions
**Invoice permissions by user role:**
| Action | Owner | Admin | Supervisor | User |
| ------------------------ | ----- | ----- | ---------- | ---------- |
| View Invoices | ✓ All | ✓ All | ✓ All | ✓ Own only |
| Create Invoices | ✓ | ✓ | ✓ | ✓ Limited |
| Edit Invoices | ✓ All | ✓ All | ✓ All | ✓ Own only |
| Delete Invoices | ✓ | ✓ | ✓ | ✗ |
| View All Invoices | ✓ | ✓ | ✓ | ✗ |
| View Financial Summaries | ✓ | ✓ | ✓ | Limited |
**Notes:**
* **Users** can only see invoices they created
* **Users** have limited invoice creation (from their own confirmed Journeys only)
* **View All** means seeing organization-wide invoices, not just own
## Common Questions
**No.** Invoices in Odia are created from confirmed Journeys. The Journey serves as the source of:
* Service line items
* Pricing information
* Customer/traveller details
* Trip reference
**Workflow:** Journey → Confirmed Journey → Invoice
**Why?** This ensures invoices always match actual confirmed services and prevents billing errors.
**The invoice does NOT automatically update.** Invoices are independent financial documents — prices and descriptions are locked when you save.
**If you change Journey services or pricing:**
1. The public invoice link and PDF continue showing the **original saved prices**
2. When you open the invoice for editing, affected line items show an **"Updated"** badge
3. Hover over the badge to see what changed (e.g., "Price changed: $500 → $600")
4. Save the invoice to accept the new prices, or leave it as-is to keep the original values
**If you add or remove services on the Journey:**
* New services appear with a **"Will be added"** badge — check the box to include them
* Removed services show a **"Will be removed"** badge and are automatically deselected
**Best practice:** Finalize all Journey details before creating invoices. If changes happen afterward, open the invoice to review the "Updated" badges before sending to clients.
**Odia now fully supports partial payment tracking!**
**To record a partial payment:**
1. Open the invoice in edit mode
2. Click **"+ Record Payment"** in the right sidebar
3. Enter the partial amount received (not the full invoice total)
4. Add payment date and optional notes
5. Click "Record Payment"
**What happens automatically:**
* The invoice status updates to **"Partially Paid"** (orange badge)
* The remaining balance is calculated and displayed
* Payment appears in the payment history with all details
* You can record additional payments as they come in
**Tracking multiple partial payments:**
* Each payment is recorded separately with its own date and notes
* Total paid and remaining balance update automatically
* When total payments reach the invoice amount, status changes to "Paid"
* Visual progress bar shows payment completion percentage
**Example:** For a $5,000 invoice, you can record a $2,000 deposit, then later add a \$3,000 final payment. Each payment is tracked individually with full details and notes.
**The "Mark as Paid" quick action automatically:**
1. **Calculates remaining balance** - System checks invoice total vs. payments already recorded
2. **Creates payment record** - Adds a payment for the exact remaining amount
3. **Sets payment date to today** - Uses current date (you can edit later if needed)
4. **Adds automatic note** - Payment note says "Marked as paid"
5. **Updates status to Paid** - Invoice status becomes "Paid" with green badge
**Where to access:**
* Invoice list page → Click "..." menu → Select "Mark as Paid"
* Only available when the invoice has a positive outstanding balance
**When to use:**
* Quick status update when full payment received
* Simple cash transactions without detailed tracking needs
* Batch processing multiple paid invoices
**When NOT to use:**
* The invoice total is zero or needs correction
* Need to record specific payment date other than today
* Want detailed payment notes or reference numbers
* Handling partial payments (use "Record Payment" instead)
**Deleting payments:**
* Yes, you can delete any payment record
* Hover over the payment in the payment history to reveal the delete icon
* Deleting is permanent - invoice status will automatically recalculate
**What happens when you delete a payment:**
* Total paid decreases by the deleted amount
* Invoice status may revert:
* "Paid" → "Partially Paid" or "Sent"
* "Partially Paid" → "Sent" (if no payments remain)
* Remaining balance increases
**Editing payments:**
* Currently, you cannot directly edit a payment
* To correct a payment: Delete the incorrect one and record a new payment with correct details
* This maintains a clean audit trail of all payment changes
Be careful when deleting payments - the action is permanent and will affect the invoice status and remaining balance calculations.
**Invoice status updates automatically based on payments recorded:**
| Total Paid | Status Shown | Badge Color |
| ---------------------------------------- | --------------- | ------------ |
| \$0 | Not Paid / Sent | Gray or Blue |
| $1 to $4,999 (on \$5,000 invoice) | Partially Paid | Orange |
| \$5,000+ (equal to or more than invoice) | Paid | Green |
**Key points:**
* Status calculation is instant - updates as soon as you record or delete a payment
* No manual status changes needed
* System compares total paid vs. invoice total automatically
* A zero-total invoice is never treated as paid
* "Overpaid" status appears if payments exceed invoice total
**Status visibility:**
* Badge appears on invoice list page for quick scanning
* Payment tracker in sidebar shows detailed breakdown
* Color coding makes it easy to identify payment status at a glance
**Yes, absolutely!** Payment recording is available at any time:
**After sending:**
* Invoice status can be "Sent", "Overdue", or any other status
* Record payments as you receive them, regardless of invoice status
* Status will automatically update from "Sent" to "Partially Paid" or "Paid"
**Before sending:**
* You can also record payments on draft invoices
* Useful for pre-paid deposits or advance payments
* Invoice will show correct payment status when sent to client
**Payment dates are flexible:**
* Record payments with past dates (backdated payments)
* Use today's date (default)
* Set future dates if needed for accounting purposes
**Common workflow:** Client sends payment → You verify it cleared → Immediately record payment in Odia → Invoice status auto-updates → Client sees updated status if they have access.
**Invoice branding:** Your organization logo and branding from Settings appear on invoices automatically.
**Template customization:** Full custom template design is not currently available. Invoices use a standard professional format with your branding.
**What you can customize:**
* Organization logo
* Contact information
* Payment terms and instructions
* Additional notes and terms
**Future enhancement:** Custom invoice templates are planned for future development.
**For audit and record-keeping reasons:**
* Once an invoice is sent to a client, it becomes part of your financial record
* Deleting sent invoices could create gaps in your invoice numbering
* Accounting best practices require maintaining invoice history
**What to do instead:**
* **Cancel** the invoice if the client cancelled or services won't happen (keeps a business record)
* **Archive** the invoice if it was a mistake or duplicate (removes from all views and calculations)
* Create a new corrected invoice if needed
**Can delete:** Draft invoices that have never been sent
## Related Documentation
* [Confirmed Journeys](/features/itineraries) - Creating confirmed Journeys that generate invoices
* [Journeys](/features/proposals) - Building Journeys that can be confirmed and invoiced
* [Supplier Commissions](/features/supplier-commissions) - Billing suppliers for commission they owe you
* [Settings - Financial](/features/settings#financial) - Setting up currencies and payment terms